Getting an Attacker IP Address from a Malicious Linux At Job
Attackers on Linux often try to establish persistence so they can maintain access to a host. The most common way to do this is with a cron job that is scheduled to run and re-install malware if it has been removed. However, an often overlooked persistence method is putting scheduled jobs in the Linux at job scheduler.
The at command allows users to schedule commands to run just like with cron, but they tend to be commands to run one time in the future and not commands to run repeatedly like cron. But consider if an attacker inserts a command to run six months from the date of intrusion. You may think you got rid of them only to find they return at a future date when their command runs and rolls out the welcome mat again for them.
This is why it’s always a good idea to check your Linux hosts for at commands you don’t recognize with a simple atq command line call when on a host. But also, it’s not a bad idea to manually review at jobs to make sure they are not running things they shouldn’t. For incident responders, checking for malicious at jobs is mandatory. This is because if an attacker has inserted an at command you are in luck because by default many Linux systems put the IP address of the system into the entry.
Checking for Malicious Linux At Jobs
There are two ways to view at jobs on a host. You can use the atq command to dump all at jobs and then the at command to view them.
root@ubuntu-18-1:~# atq
2	Sat Jul 25 21:56:00 2020 a root
3	Sat Jul 25 21:56:00 2020 a root
4	Sat Jul 25 21:56:00 2020 a root
1	Sat Jul 25 21:32:00 2020 a root
root@ubuntu-18-1:~#
The above we see four jobs for the root user. The first column is the at job number which we can list individually with the at -c <jobnum> command:
root@ubuntu-18-1:~# at -c 1
#!/bin/sh
# atrun uid=0 gid=0
# mail root 0
umask 22
SSH_CONNECTION=192.168.1.11\ 49945\ 192.168.1.234\ 22; export SSH_CONNECTION
LESSCLOSE=/usr/bin/lesspipe\ %s\ %s; export LESSCLOSE
LANG=C.UTF-8; export LANG
OLDPWD=/var/spool/cron; export OLDPWD
XDG_SESSION_ID=3359; export XDG_SESSION_ID
USER=root; export USER
PWD=/var/spool/cron/atjobs; export PWD
HOME=/root; export HOME
SSH_CLIENT=192.168.1.11\ 49945\ 22; export SSH_CLIENT
XDG_DATA_DIRS=/usr/local/share:/usr/share:/var/lib/snapd/desktop; export XDG_DATA_DIRS
SSH_TTY=/dev/pts/4; export SSH_TTY
MAIL=/var/mail/root; export MAIL
SHLVL=1; export SHLVL
LOGNAME=root; export LOGNAME
XDG_RUNTIME_DIR=/run/user/0; export XDG_RUNTIME_DIR
PATH=/usr/local/sbin:/usr/local/bin:/usr/sbin:/usr/bin:/sbin:/bin:/usr/games:/usr/local/games:/snap/bin; export PATH
PS1=sandflysecurity#\ ; export PS1
LESSOPEN=\|\ /usr/bin/lesspipe\ %s; export LESSOPEN
cd /var/spool/cron/atjobs || {
	 echo 'Execution directory inaccessible' >&2
	 exit 1
}
hxxps://pastebin.com/4154
This dumps each job number and you can see some interesting things. The most important bits are all those environment variables and the information they contain.
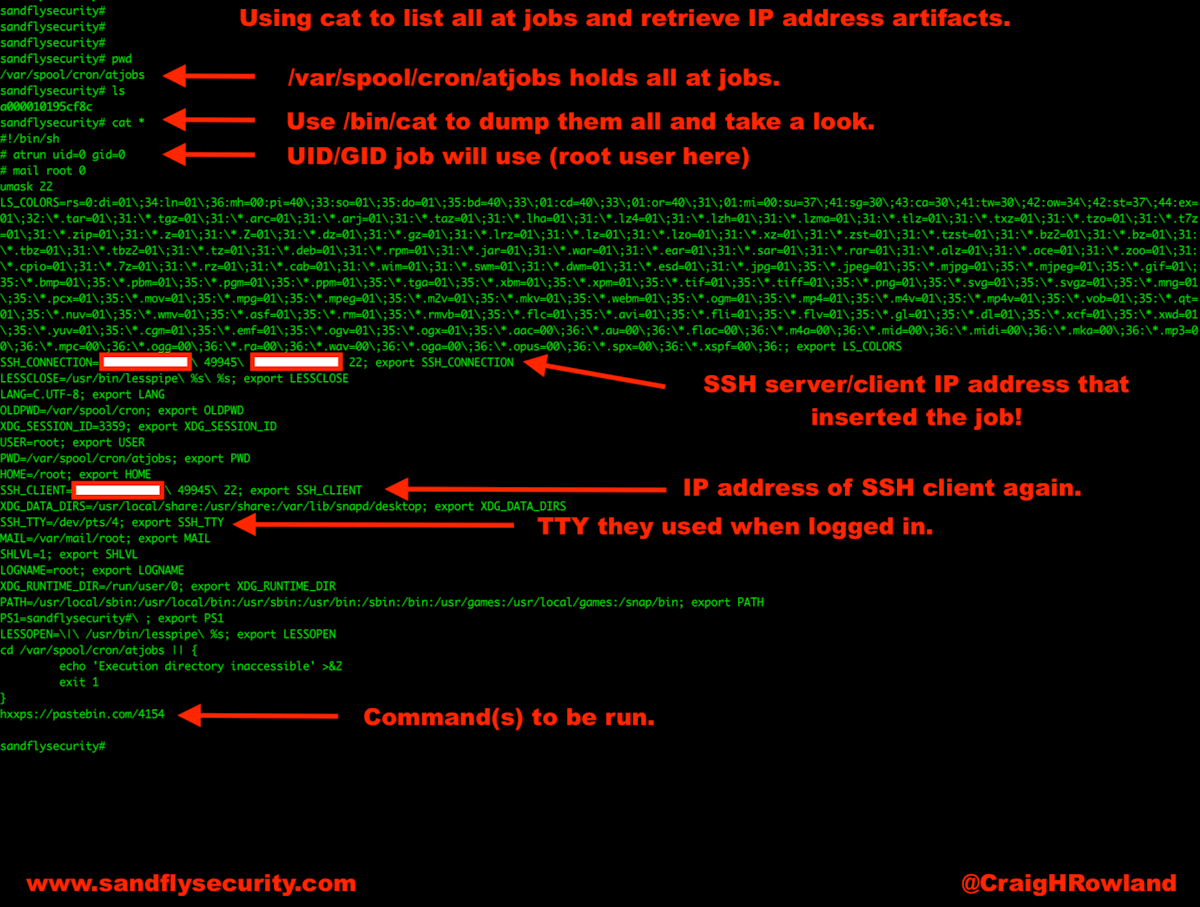
If you want to see all the at jobs at once quickly, you can simply use the cat command to dump them like this:
cat /var/spool/cron/atjobs/*The above will dump out all the entries so you can scroll through them looking for anything odd. In a typical job entry you'll find things like:
User and binary names to investigate.
Shell settings that could indicate the type of system that inserted the attack.
SSH connection data with IP addresses of the local and remote systems.
Other IP addresses and even proxy information setup in the environment.
Random bits of leaked data set automatically by the shell during login that the attacker would rather you not find.
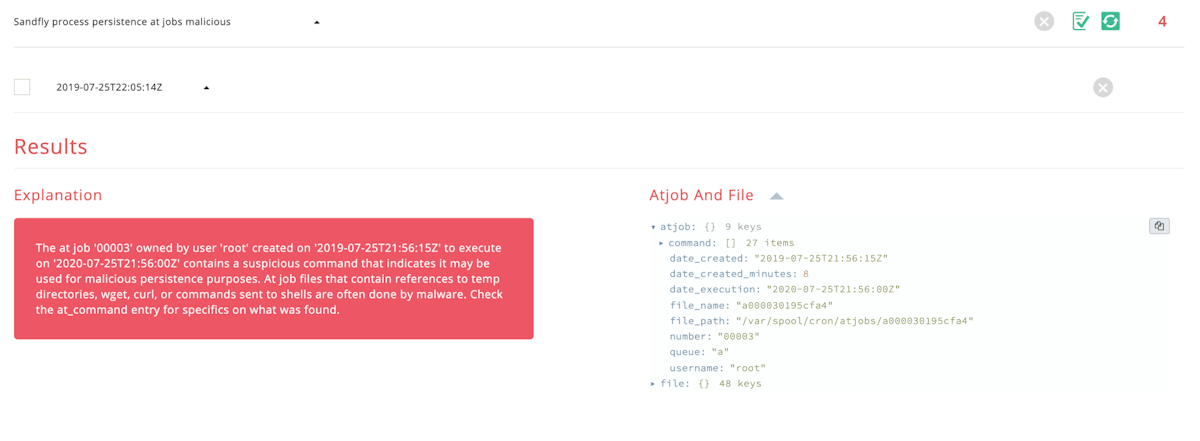
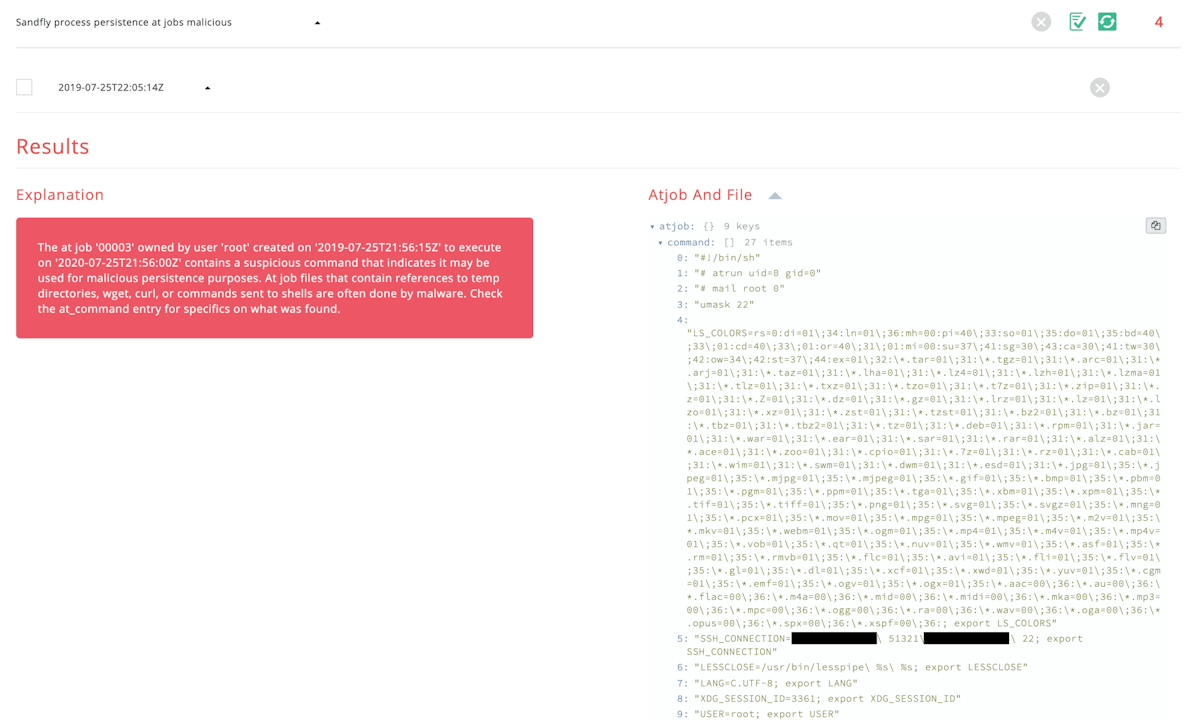
At jobs are a goldmine of forensic data and shouldn't be overlooked. See the image below for some real-world examples of what an Ubuntu system at job would leave in the entry.


Always Check At Jobs During Incident Response
In general, at jobs are much less frequently used than cron on Linux hosts. If you see an at job and you didn’t put it there, it’s a good idea to find out who did and why. If you’re investigating an incident, checking for roque at jobs is a good idea and can give you valuable clues about an attacker even if they deleted their connection information from other logs on the target host.
Have Sandfly Check for Malicious At Jobs
Even better than waiting for an incident before checking your at jobs, you can have our agentless security platform do it for you. We check for persistence attacks on Linux 24 hours a day. Why not give Sandfly a free trial?